Welcome to our complete beginner’s guide for the new Peloton Tread. Here we will cover everything you need to know from safety considerations, warranty information, selecting classes, and more!
Table of contents
- The Complete Peloton Tread Guide for Beginners [Video]
- Deciding where to place your Peloton Tread
- Safety considerations
- Treadlock
- Controlling speed and incline
- Stop button and safety key
- Peloton workout history and statistics
- Adjusting personal records
- More profile settings
- Finding members and using hashtags
- Peloton badges and challenges
- Tread class categories
- Peloton Tread programs
- Sessions and stacking
- Heart rate and Strive Score
- Extended warranty
- Comfort accessories
- Multitasking options
- Internet speed test
- Final tip to get started
The Complete Peloton Tread Guide for Beginners [Video]
Video brought to you by Upsie Extended Warranty
(use code “9to5” for an additional 10% discount!)
Deciding where to place your Peloton Tread
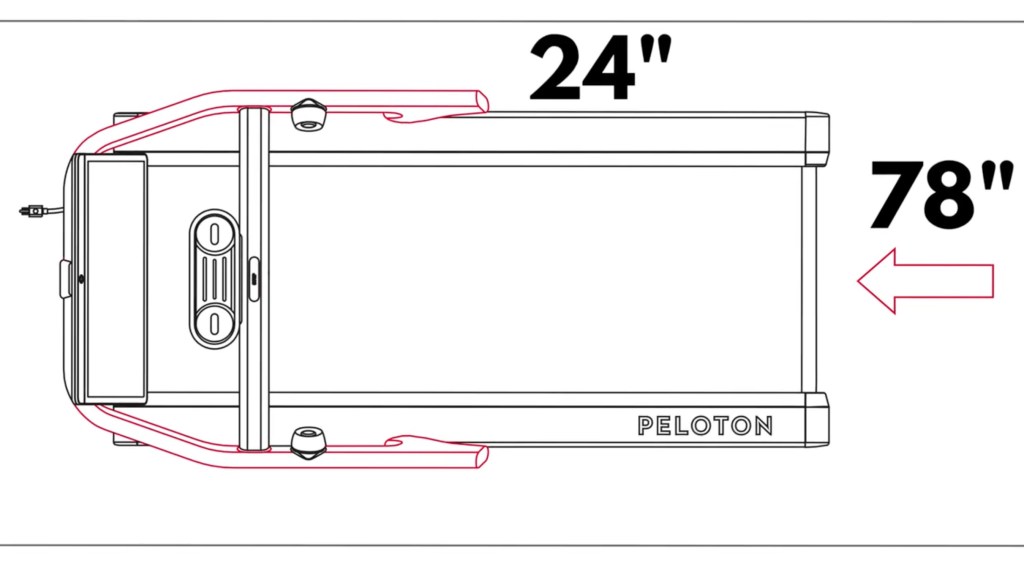
When bringing a treadmill into your home, you have to consider more than you do with other types of equipment. The space required is beyond the unit itself; you need a power source and there are safety considerations. The Peloton Tread itself is 68 inches long and 33 inches wide, but you need to make sure that you have enough clearance behind you for safety and to the side, for convenience.
Personally, I feel safe and comfortable with four feet of clearance behind me and plenty of space to one side for getting on and off and six to eight inches between the other side and the wall. Peloton suggests that you have at least 78 inches of clearance behind the Tread and 24 inches of clearance on both sides.
Safety considerations
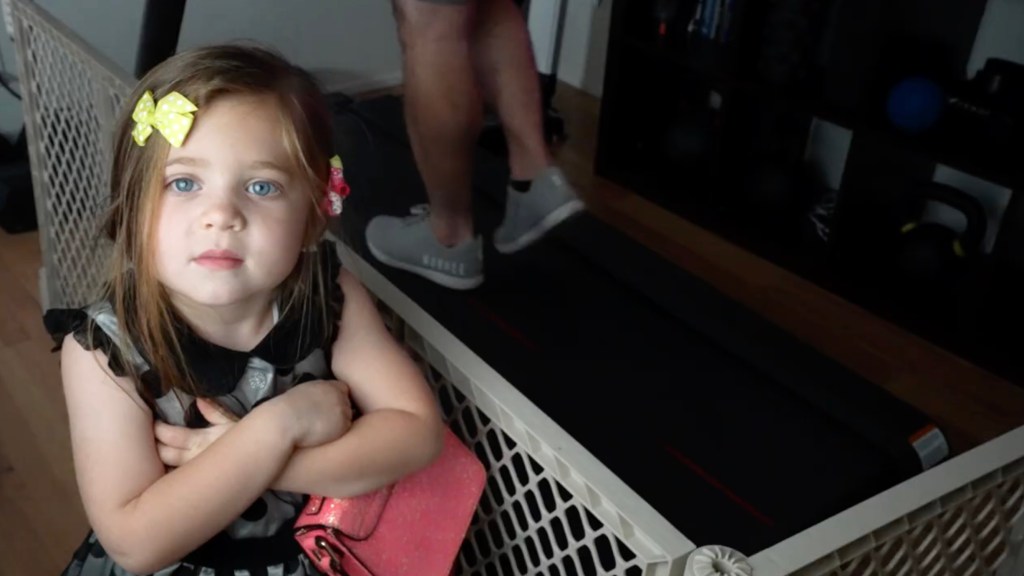
Once you’ve narrowed down the list of spaces in your home with enough space, an important consideration is if you’ll be using the Tread in a room that’s also used by young kids or pets. I strongly suggest purchasing a kid fence to keep a boundary between them and the equipment. This won’t be ironclad protection against injury, but in conjunction with safety features discussed later on, it’s helpful.
And as I recommend with almost all home-connected fitness equipment, buy a surge protector if you don’t have one. The last thing you want is an electric surge permanently destroying all the inner workings of your Peloton Tread.
Treadlock
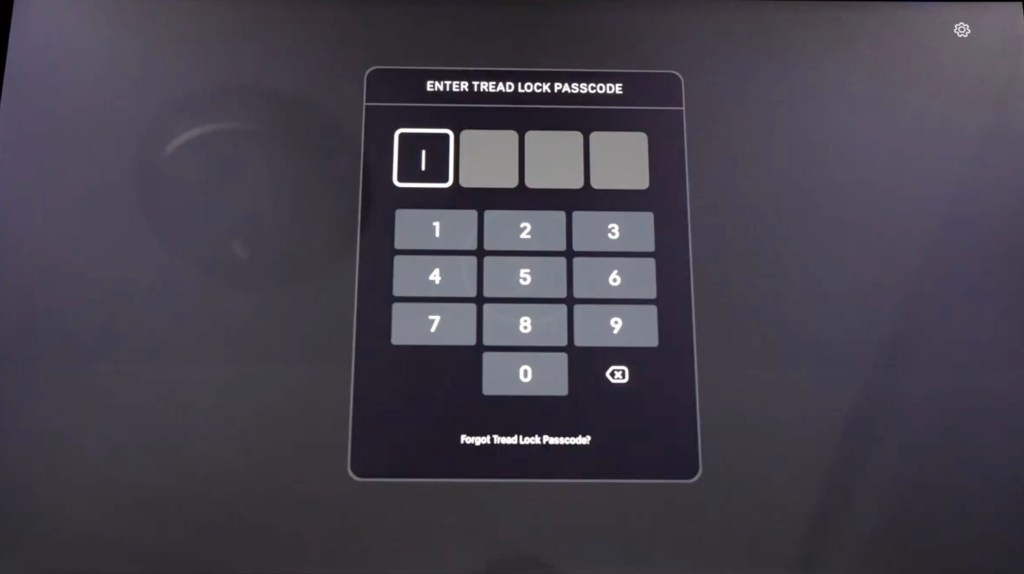
After turning on your Tread, one of the first things you’ll have to do is set a lock passcode. This is a four-digit code meant to ensure that any person on the Tread should be using it, avoiding accidents involving young kids or animals. The Tread will require you input the lock passcode every time you want to use it. You will be asked to reenter the code if you stop using the Tread for more than 30 seconds (like during a Bootcamp class).
Controlling speed and incline
To control the Peloton tread, there are three ways to increase and decrease speed and incline. The first way, which you will likely use most, is to rotate the knobs on either side. The left knob controls incline and the right knob controls speed. It takes a bit of practice to get used to how much you need the knobs to rotate to get to the speed or incline desired, but you will get more accurate with practice.
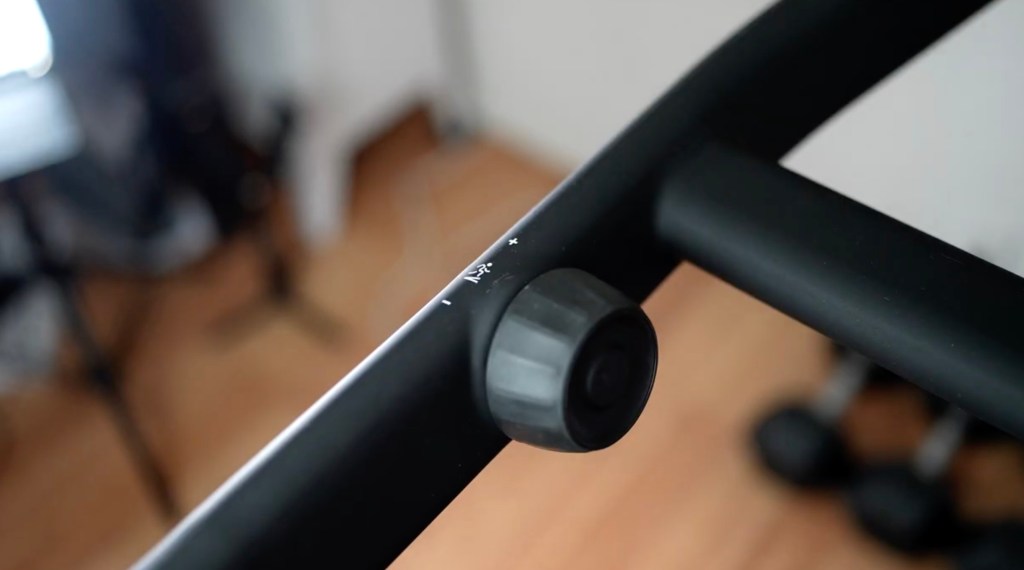
Each knob also has a button at its center to increase the speed/incline faster. A single press on the left knob will increase your incline to the next percentage. Meaning, whether you are at one or 1.5%, a single click will take you to 2%. Similarly, a single press on the right knob will increase your speed to the next mile per hour. Meaning, whether you are running at five miles per hour or 5.2 miles per hour, a single click will take you to exactly six miles per hour.
An additional way to control speed and incline is through three custom shortcuts you can set, allowing you to jump quickly to numbers you use frequently. This is done simply by pressing the on-screen incline or speed numbers for your three custom shortcuts to appear. There is a ‘customize shortcuts’ on-screen selectable, and when pressed, you can tap which of the numbers you’d like to set.
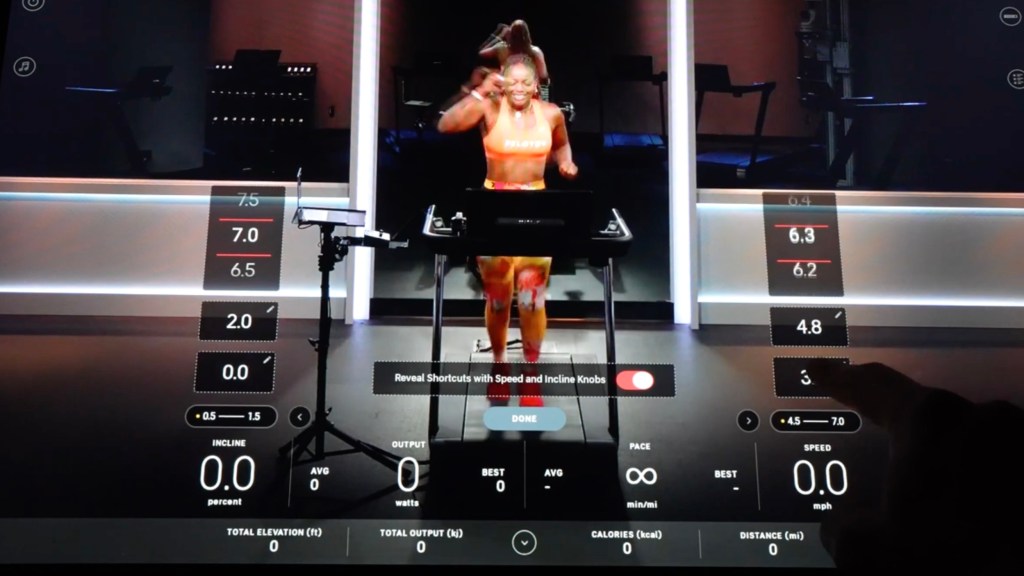
Personally, I suggest you set the bottom number to whatever your walking speed is, the middle number to your jogging speed, and the highest number to a speed or incline you find yourself frequently at during your runs.
Stop button and safety key
If you ever find yourself in a situation where you need to stop the treadmill immediately, there is a large red ’Stop’ button directly in front of you. And below that button is the Tread safety key, which is suggested that you unravel and clip onto yourself during every run. If the key detaches from the Tread, like in the course of a fall, the treadmill belt will immediately stop. This will help prevent further injuries, like friction burns.
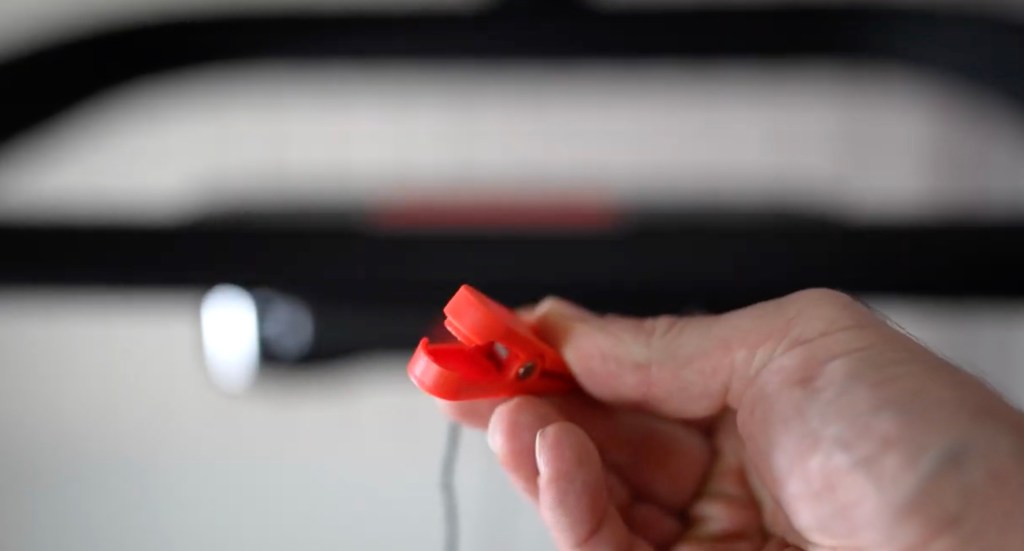
After using your tread, it’ll automatically go into sleep mode after a few minutes. You may choose to completely power it down by holding the power button on the back of the screen. Additionally, if you have young kids, Peloton suggests you remove and place the Safety Key somewhere that they can’t get it.
Peloton workout history and statistics
Back at the profile screen, if you select ‘Calendar,’ you can sort through each month to see how many classes you took, what your best outputs were, and even who your top instructor for that month was. If you want to look at the specifics of a workout, you can select your ‘Workout History.’
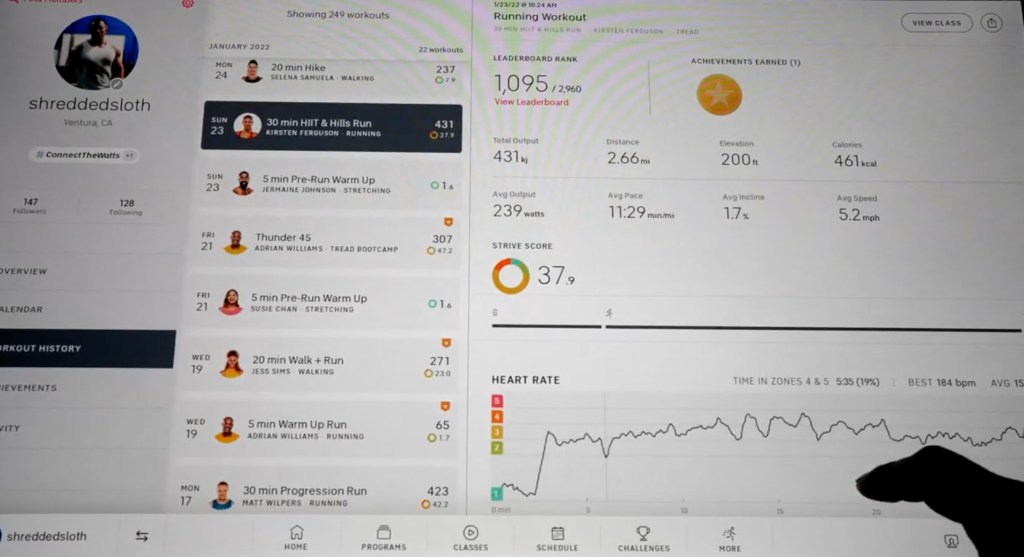
Workouts are sorted by date and tell you lots of useful information; leaderboard rank, achievements earned, total output, average output, as well as all of your heart rate metrics. This will include your Strive score and how long you spent in each of the five zones. An important tip here is that you can manually adjust your maximum heart rate by pressing the ‘Customize’ button on this graph. If more accurate heart rate data is important to you, you should definitely do this. The old formula of 220 minus your age is significantly off for most people. Check out this article where I discuss how to find a more accurate max heart rate.
Adjusting personal records
Like manually setting your max heart rate, there can be benefits to adjusting your Personal Records. Pressing the red gear icon at the top of the profile screen will take you to an area where you can adjust most of your settings. Here you can view and manage your Personal Records, which you could want to adjust every so often. For example, if you get injured or take a bunch of time off, you may not want to compare yourself to your all-time best records. In that case, click ‘Manage,’ then ‘Calculate based on workouts since,’ and ‘Edit date.’ Set whatever date makes sense for you.

More profile settings
In that Profile Settings area, this is also where you would change your picture and personal information. Under ‘Preferences’ you can change content preferences, like hiding classes that contain explicit language, or pre and postnatal classes if you have no interest in them. You can also choose to disable the display of your Strive score on your workout screen and hide it from others who may see you in a class.
There are options to enable or disable video chat, hide the visibility of an age group or gender on the leaderboard, or to make your profile private from any members not approved by you. You can also connect your Peloton to Facebook, Strava, or Fitbit.
Finding members and using hashtags
Back on the profile screen, if you want to find other Peloton members, press ‘Find Members’ on the upper left corner of the screen and enter the username of the member you are looking for. Also on this profile screen, you can edit your hashtag. In Peloton, hashtags are essentially groups you can be a part of. When you take a class, you can filter the leaderboard by hashtag to see other users in that group. A member can have up to 10 hashtags at any one time, but you will need to choose a leaderboard tag, which is the tag that everyone else will see when you are taking a class.
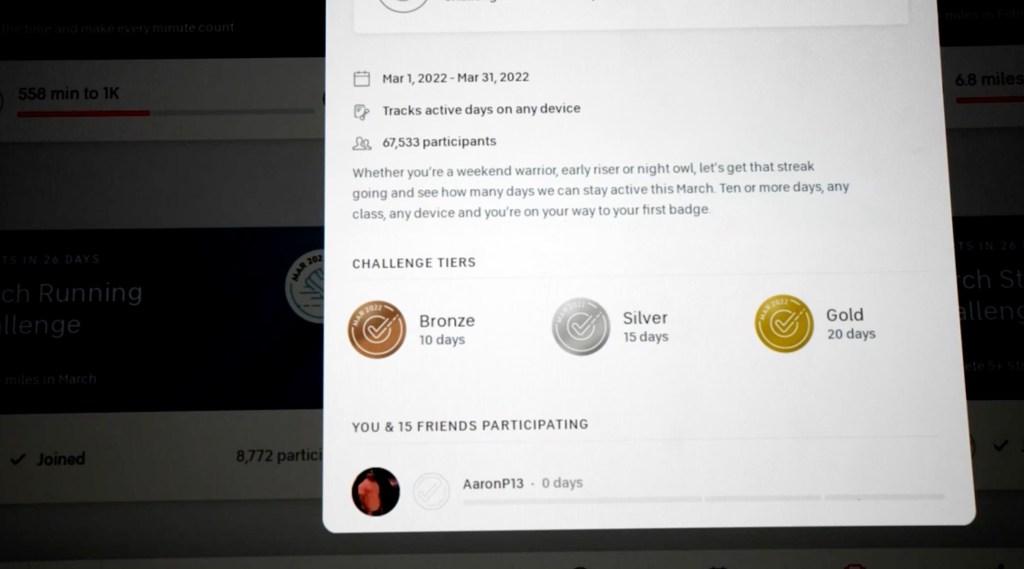
Peloton badges and challenges
In the Achievements area of your profile, you can see your earned Badges and completed Challenges. Most Peloton Challenges have three tiers of achievement; bronze, silver, and gold. Something important to know is there are different Challenges available on the Peloton Tread, bike, and app. I suggest regularly checking them all to be sure not to miss any.
Peloton class types
When you’re ready to start selecting classes to take, there are three broadcast types that Peloton offers:
- On-Demand classes are pre-recorded (initially streamed live) and available any time.
- Live classes are streamed live. Everyone on the leaderboard is at the same point in the workout and there’s potential for the instructor to give you a shoutout.
- Encore classes are a hybrid of on-demand and live. It’s pre-recorded content but available on the live class schedule and will have a live leaderboard.
Tread class categories
Here are some of the most important categories to know when just getting started with the Tread:
- Hiking, focused less speed and more about incline to help you build leg strength.
- Speed walking, very little incline with the goal to increase your speed.
- Hybrid run-walks, mixes intervals of running with walking, great for beginners.
- Endurance runs, lower intensity held for a long period of time.
- Interval runs, higher speed, possibly some max effort.
- Bootcamps, mix of running with strength training. Some of the best classes Peloton has to offer!
Peloton Tread programs
Instead of choosing stand-alone classes to take, you may opt to join one of the offered Programs. These are a collection of classes intended to help you reach a specific goal. Classes included in Programs cannot be found or scheduled anywhere else in the Peloton library.
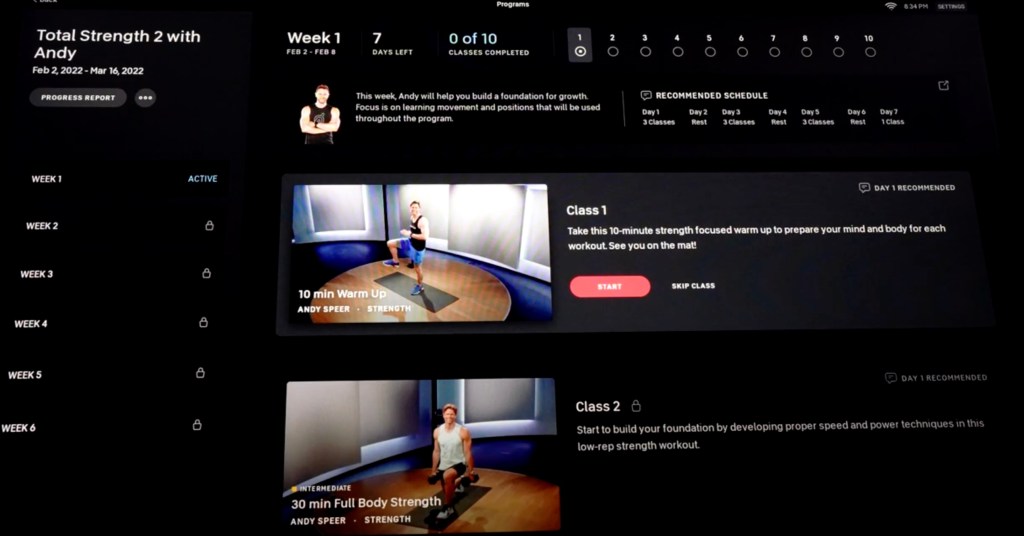
Programs have a set number of classes each week and must be taken in order. As you complete a class in a Program, the next class will be unlocked and available to you. Although, if you do not finish every class schedule for a specific week in the Program, it will move on to the first class of the next week. Programs are a great way to earn Badges on the Tread.
Scenic runs
The Tread offers three different Scenic Run options:
- Guided runs are coached classes with an instructor leading you through an outdoor run.
- Distance scenic runs are uncoached, set for a certain distance, and how fast you run increases the speed at which the video plays. This is a very fun option for testing yourself, maybe with a 5k or one mile time trial.
- Time-based runs are scenic routes with videos that play at a set speed for the duration that is selected.
‘Just Run’ on the Peloton Tread
No instructors, no scenery, just metrics on the screen is what you get when using the Just Run option. If you ever cancel your Peloton membership, this is the only thing you’ll have access to on your Tread.
Peloton class search and ‘Collections’
To search for an On-Demand class to take, you can filter by length, instructor, music genre, type, etc. You can drill down to classes you’ve bookmarked and classes that you have already, or haven’t yet, taken. You can set multiple filters to try and get a more direct search result. There is also an option to type in a helpful keyword to search through classes.
Peloton groups together some On-Demand classes into Collections. These are grouped together by a specific theme, music genre, special events, and more.
Sessions and stacking
Sessions are a way to have a live leaderboard during an On-Demand class. Unlike Encore classes, Sessions start much more frequently (as often as every five minutes) so the leaderboards typically have many fewer users present. This is a way you can coordinate with friends to take an On-Demand class together, or you can just jump into a class with anyone already in a Session.
A unique feature of Peloton is Stacking. This allows you to combine various workouts to run continuously to make up a full workout routine. For example, if you would like to do a warmup followed by a run, followed by a strength workout, followed by a stretching workout, you could put all of those together into one Stack and as you complete one, it will prompt you to start playing the next.
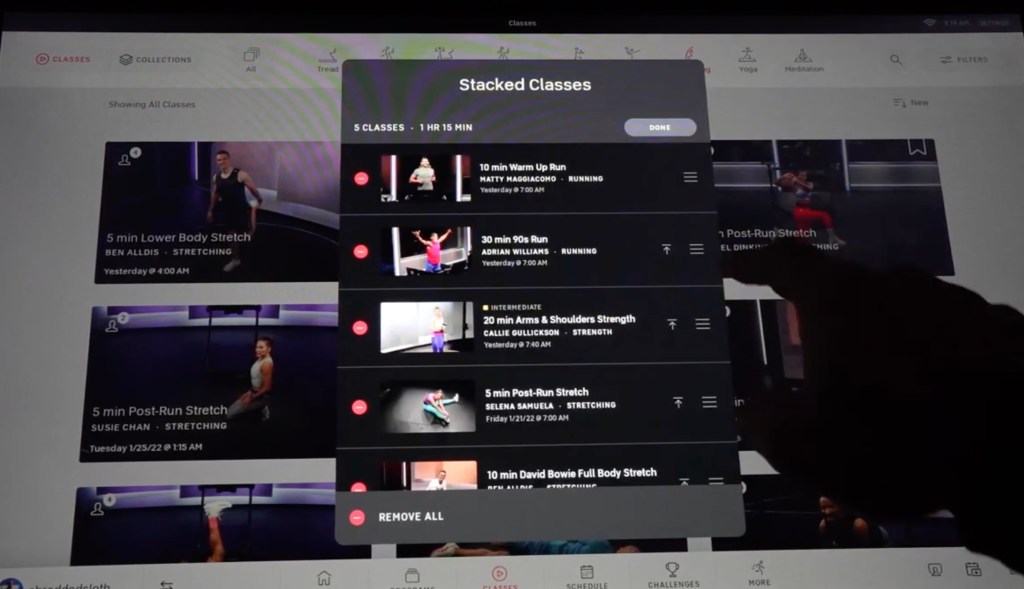
Peloton makes it very easy to Stack your classes. When you press on the class, you’ll see a Stack icon in the center, to be pressed to add to your Stack. Classes can also be added to your Stack by holding your finger on the class thumbnail. Once you’ve started building a Stack, the icon at the bottom right of your screen will take you to where you can start or modify your Stack.
Starting your Peloton Tread class
When you’ve selected your class and are ready to start, you will be met with a screen that prompts you to connect Bluetooth headphones and/or a heart rate monitor and the option to switch your hashtag visibility on the leaderboard.
Most run classes have a one-minute intro by the coach, briefly describing the workout, the treadmill button and knob functions, and screen metrics. You can skip this intro by pushing the on-screen option at the top left. The workout time will start after the intro, with an instructor-led warm-up.
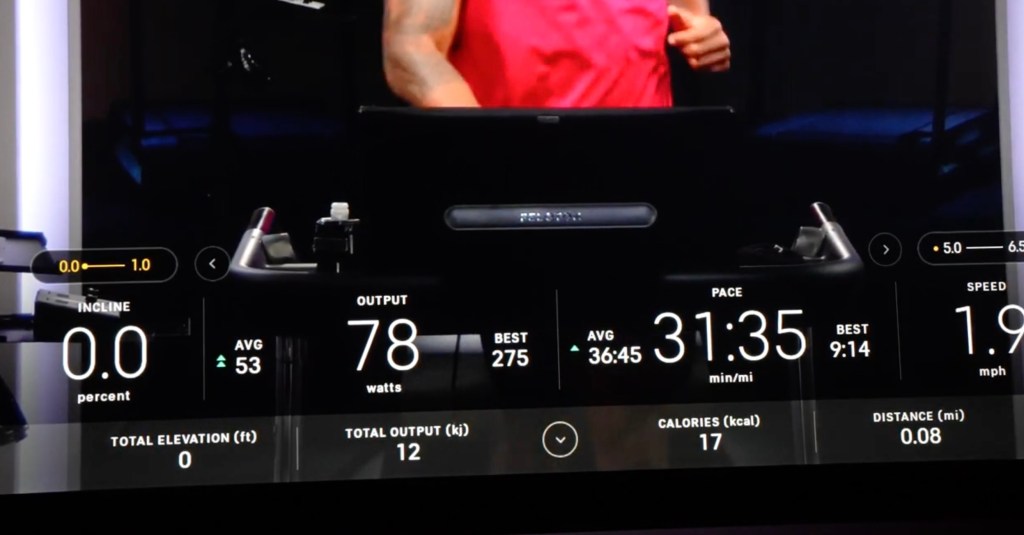
One-screen metrics
The Tread gives you a lot of metrics on its screen. On the left is your current incline percentage, with the instructor’s suggested incline range above it. Similarly, on the right side is your current speed in miles-per-hour, with the suggested speed range. You can hide these suggestions if you want, by pressing the arrow next to them. Between these two (current incline and speed), you can see your current mile pace as well as your total wattage output. Your rank on the leaderboard is by total wattage output.
Leaderboard
When taking a Live, encore, or Session class, the Leaderboard is limited to the users streaming that same broadcast. On-Demand classes allow you to view a leaderboard made up of everybody who has ever taken that class, or just of who is currently taking that class. No matter the class type, you can always interact with the users who are currently taking the class. Tap their profile pic and send a high-five! There are options to filter down the leaderboards by gender, age group, friends, or hashtags.
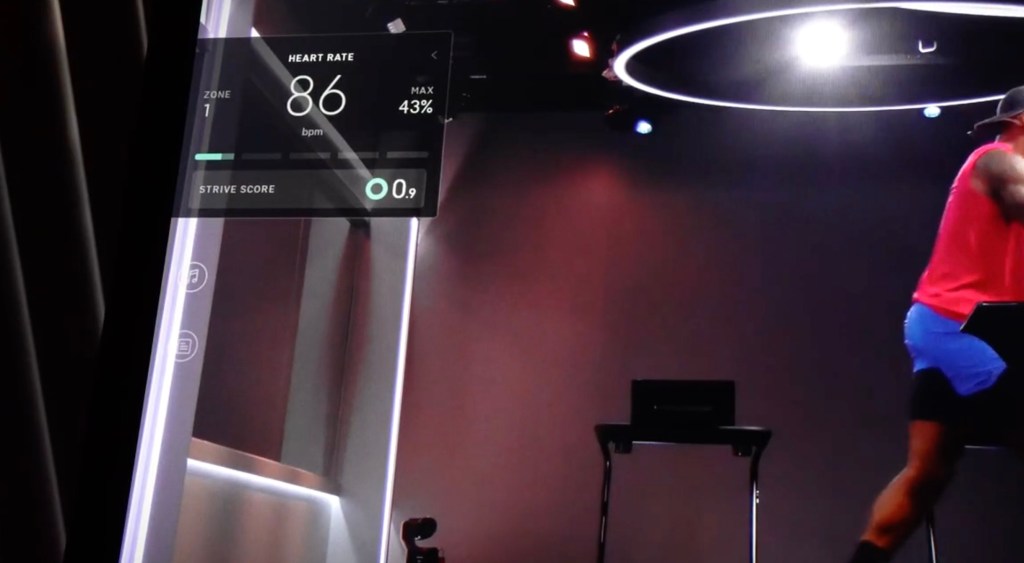
Heart rate and Strive Score
If you’re wearing a compatible heart rate monitor, you’ll see your current heart rate and Strive score on the left side of your screen. Peloton’s Strive scores are an interesting concept, meant to reflect how hard you worked during your workout. I wouldn’t put too much thought into it, but there it is.
Music, captions, and sound adjustments
During classes, you have no control over the music played, but if you really like a song that comes on, press the heart icon to ‘favorite’ it. Under your Peloton profile, you can see all the favorited songs and connect them to your Spotify or Apple music if you would like to listen to those songs later.
If you want to turn up or down the sound during the class, the easiest way is to tap the buttons on the right side of the monitor. This will allow you to both adjust the volume and choose if you prefer the music or instructor to be louder.
A little-known feature that I have really fallen in love with is the availability of captions for most classes. You turn these on in Settings, under Subtitles. This could be helpful if you find it hard to follow audible instructions with music playing.
Extended warranty
My most immediate suggestion for accessories isn’t an accessory at all: an extended warranty. The warranty that comes with this treadmill only lasts one year. And so even though that means you have that year to get an extended warranty, I suggest getting it taken care of right away. This is not something you want to forget to do.
Peloton makes quality equipment, but treadmills are notoriously known to have issues over time. The average cost of fixing just one problem is well over the cost of purchasing an extended warranty. That said, I do not suggest buying your extended warranty through Peloton. A third-party warranty provider will always give you better care and repairs.
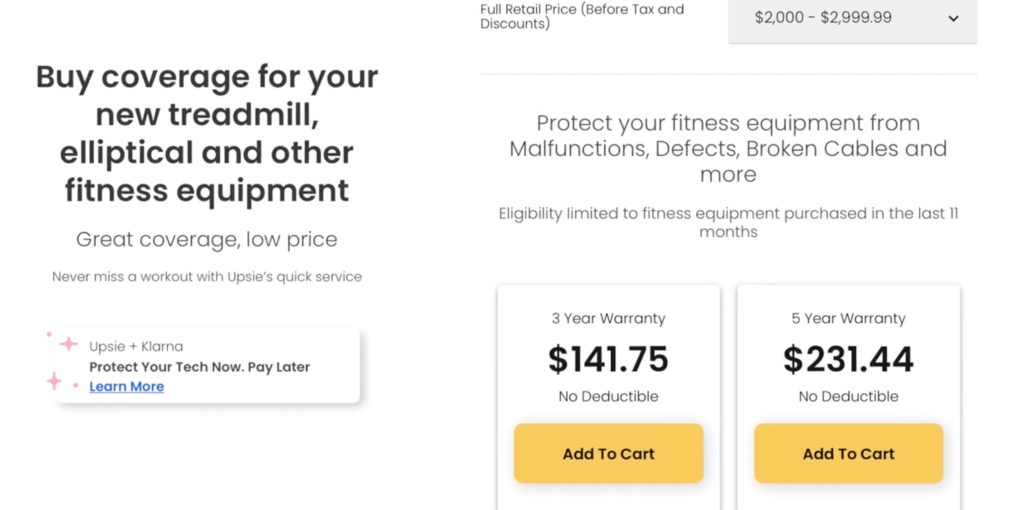
Of the companies I’ve researched, cost compared to service, I recommend Upsie for your extended warranty (use code “9to5” for an additional 10% discount!). If you opted to extend your warranty with Peloton to three years, it would cost $230, whereas Upsie only costs $141. And if you’d like to protect your Tread for longer than three years, that’s not even an option with Peloton, whereas you can get a five-year plan with Upsie for the same price that you get Pelton’s three-year plan.
And in case you still need convincing, Upsie warranties are transferrable (Peloton’s are not). Meaning, if you ever need to get rid of your Tread or want to upgrade to a Tread Plus in the future, you’ll be able to sell your Tread for a significant amount more because you’ll be one of the only people selling it with an extended warranty still intact.
Comfort accessories
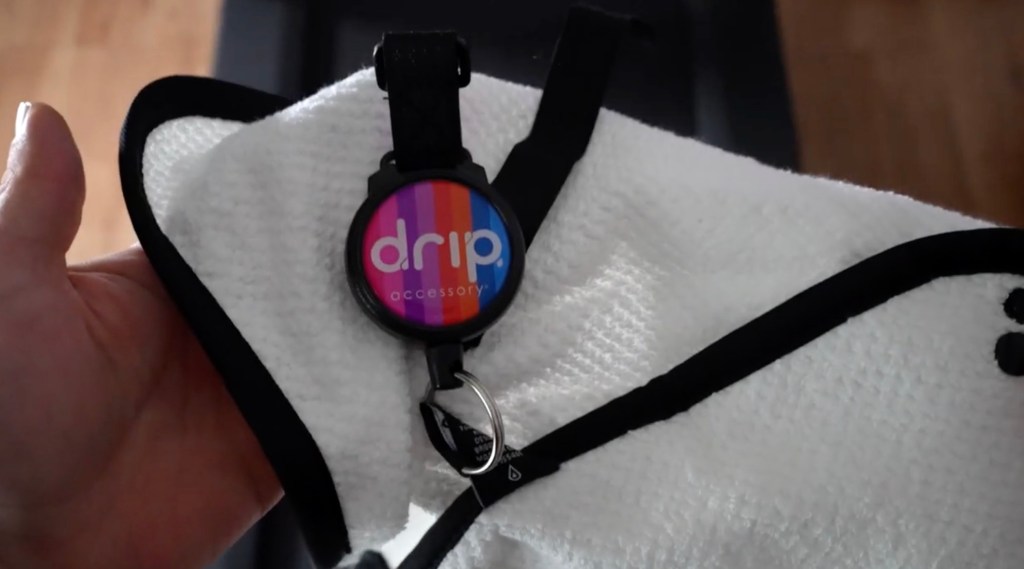
For comfort and to keep your Tread looking nice, you’re going to want a small sweat towel. Personally, I use the Drip Towel by Drip Accessory. It secures to the Tread without impeding my run, and is retractable, making it super easy to use. No special washing instruction, just throw it in the washer and dryer to get it ready for another run.
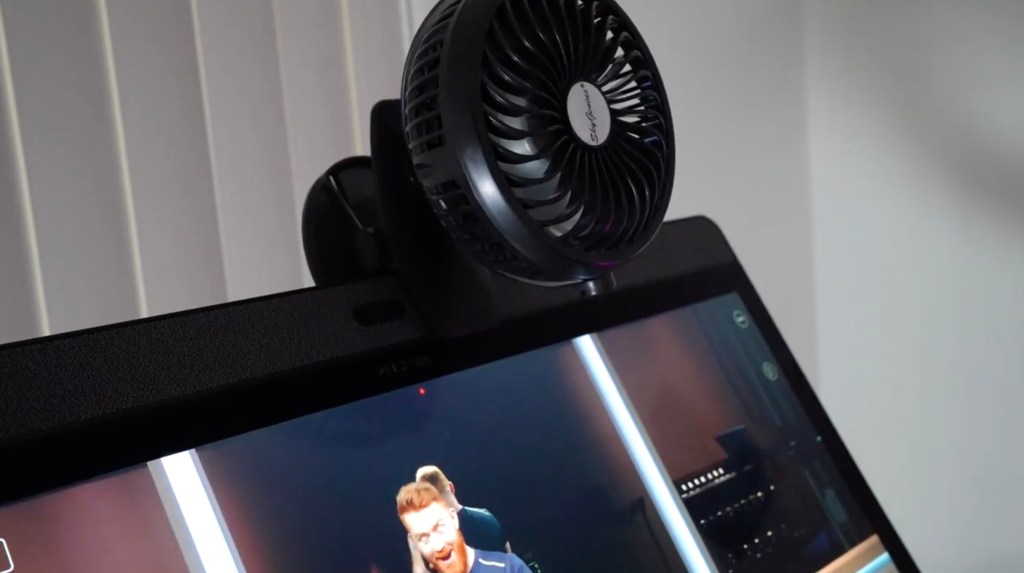
The Peloton Tread is very sleek, and that is at the cost of one feature: there’s no built-in fan. I went through some extensive clip-on fan testing for our Peloton bike, and of those, I’ve transitioned the Sky Genius fan onto our Tread. The amount of bounce feedback you get on your Tread will vary depending on the floor below your Tread, so what fan works best for you may be different.
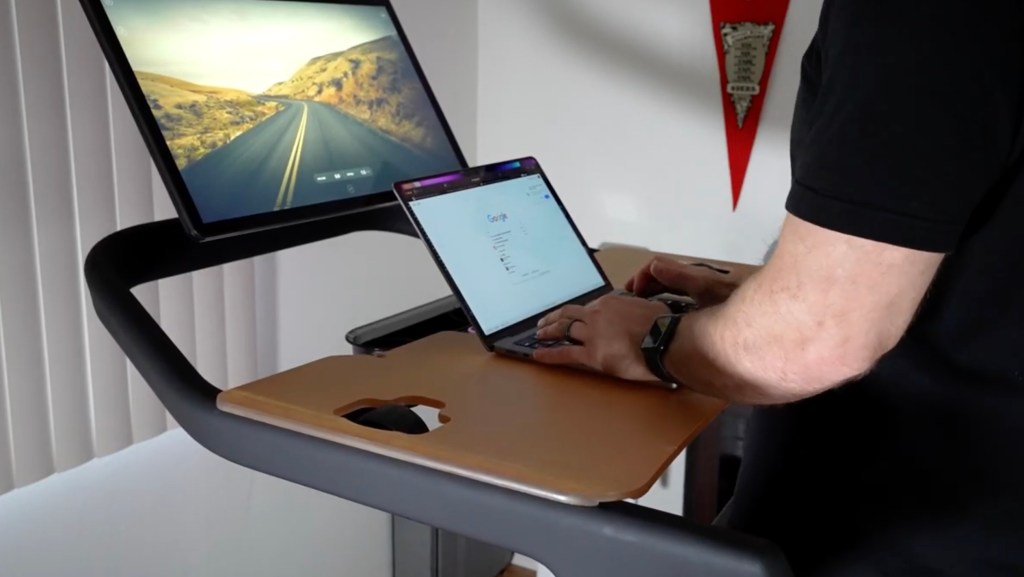
Multitasking options
The Peloton platform is great, with so much to offer, no one could ever claim to have completed every class. But at its core, the Peloton Tread is simply a treadmill. The back of the monitor houses an available power source, so you can plug in any device with a USB-C connection.
There are various device holders and trays on the market. I have found the best fit for Peloton equipment to be from Top Form (use code “WATT” for 10% off). Their tray transforms my Tread into a walking workspace and the tablet mount I have for my Peloton bike works well on the Tread, as well.
Internet speed test
Peloton production quality is some of the best in streaming fitness. It would be rare to experience issues with a broadcast and it be on their end. If you’re having streaming issues with any of the classes, go into the Device Settings and select to run a Speed Test. This will test your network connection speed and let you know if that’s your issue. It’s common to decide to put your exercise equipment somewhere, like the garage, and not realize how the distance from your Wi-Fi equipment could affect streaming.
Final tip to get started
All this is for nothing without one very important thing – you using your new Tread. If you are just getting started, my biggest suggestion is to start slow but be consistent. It’s easy to be excited by your new Peloton Tread, so if running is new to you (or it’s been a long lapse) do a little bit less each session than you think you could handle. Be extremely consistent with how many days you use the Tread per week and gradually build on the volume and intensity over time.
Running is not at all like biking and can be much more detrimental when you try to do too much, too quickly. Compared to biking, there is a lot more impact and you can accumulate injuries quicker by overdoing it.
Other articles you may enjoy:
FTC: We use income earning auto affiliate links. More.
